Yellow Gerbera Daisy Wreath 2016
This is a fairly easy project to undertake. It's very colorful with the bright yellow daisies.
SuppliesXX750469 Sky Blue 24" Pencil WreathFX181829 Potted Yellow Gerbera Daisy
XB96410-05 Denim/Ivory Poly Jute Mesh 10" x 10 yards - 2 Rolls
Q617140-09 Lime Canvas Ladybug Ribbon 2.5" x 10 yards
X314840-22 Daffodil Canvas Ribbon 2.5" x 10 yards
X314809-12 Red Canvas Ribbon 1.5" x 10 yards
A limited number of kits containing all the materials will be available. Click here to purchase Wreath Kit
After the kits and/or products have sold out, the tutorial will be left up since directions can be applied to other styles of mesh and embellishments.
First step was to cut the mesh into 10" x 10" pieces. The mesh is a combination product with a polypropylene base and a jute thread which gives it a little different texture than just plain poly. The rolls are 10" in width and 10 yards in length. It takes more than one roll to do this wreath, but doesn't take all of the second roll. This gives you a little mesh left over in case you need to fill in any gaps or anything.
We're using a cutting mat and rotary cutter here, but you can use scissors. Mesh ravels regardless of what you cut it with. We are going to spray the mesh with an adhesive later in the tutorial to help reduce the raveling.
We use a 24" x 36" self healing Omnigrid Cutting Mat and a 45mm Omnigrid Rotary Cutter (these are available at Amazon and we have included our affiliate links.)
We made this wreath using the "curly" technique. Each 10" x 10" piece of mesh was rolled up with the selvage edges to the outside. Pinch the curl in the middle and make a cluster of three curls, laying them down with the cut side down. You can angle the position of the curl. Secure a cluster of three curls in one of the twist on the outer ring of the Pencil Work Wreath.
We used a 24" Skyblue Pencil Work Wreath. The 24" wreaths measure 15" across the largest ring, but with the addition of mesh, ribbons etc. you wind up with a finished wreath that may measure 24" to 30" or so. It just all depends on what you add to your wreath and the technique you use.
To make the curl, just flip the mesh to it where to tend to start rolling up. Having the selvage (uncut) edges to the outside, roll the mesh up into a curl with a diameter of about 1 to 1.5" inches. You may can hold the curls in your hand until you get three done or use a clip or clothespin to hold them. Pinch in the center and secure the cluster into a twist.
Start on the outer ring of the Pencil Wreath and secure a cluster of three in each twist.
Once you have completed the outer ring, move to the inner ring and add a cluster of three curls to each twist.
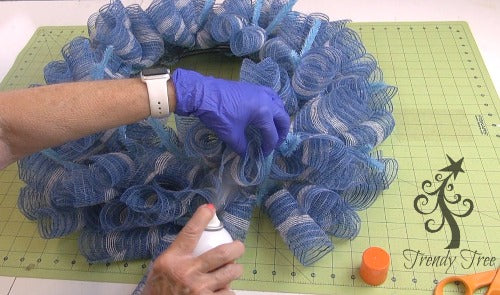
This next step is completely optional. We have been experimenting with different products that might help reduce raveling and Elmer's Craft Bond Spray Adhesive has been the best product so far that we have used.
It is a little messy and you might want to do this step outside. Lift out and separate the curls a bit and spray each cut side with the adhesive. They will be tacky pretty quickly.
When you have sprayed the entire wreath, go back and lift and separate the curls to keep them from sticking together. You might have to re-roll a curl. Set the wreath aside and let dry. It can take a few minutes to a couple of hours to be dry enough to work with. It just all depends on the weather etc.
You might want to experiment with some scraps before spraying your wreath. Climates are different and some customers have reported that this didn't work well for them, so we would hate for you to wind up with a sticky mess. We have also tried hair spray, brush on glue and Mod Podge. Here's a link to our tutorial on our experiment. Can We Stop Paper Mesh from Raveling? Maybe!
These products are well worth a try, since they do help reduce raveling. All mesh ravels. The more you handle it and the more you cut it, ravels. Just clips strings when you done. It's better to clip than to pull or you'll get a never ending ravel started.
Next we were ready to attach the pot of daisies. We put three chenille stems together for a length that would go around the neck of the pot.
You could use floral wire or anything that you could tie around the pot and then tie to the Work Wreath frame.
The problem with the chenille stem was that the stem would slip down on the pot and not stay snug. Something elastic would have worked better, but this is what we had to work with at the time)))
We covered the chenille stem with some clear tape to hold it in place. Position the pot to where the tallest of the daisies is on the back. This is the position you want the pot to be in when you secure it to the Work Wreath form.
We took a strip of the 2.5" yellow ribbon and placed a longer strip of the 1.5" red ribbon in the center of the yellow. The red ribbon was hot glued to the yellow to help keep it in the center.
You could hot glue the ribbon to the pot, but we just tied it around the pot and tied the red ribbon in the back. Typically we try not to do anything permanent to the products since we usually take them apart after a tutorial and re-use items again. Also when we are making a wreath for our own use, we like to do it this way so we can remove items, take apart and re-purpose later. I love "finding" and old wreath or arrangement in the attic, taking it apart and making something "new" of out it.
Position the pot on the Work Wreath frame close to one of the straight post. Flip the wreath over and secure the chenille stems around the Work Wreath Frame. Go around the straight post to help hold it in place.
Take another chenille stem and secure a couple of the longer stems to the Work Wreath frame to help keep the pot from falling forward. It helps to place the wreath on a hanger and test the placement of the pot. Add extra chenille stems as necessary.
The stems of the daisy are wired so you can shape them any way you want.
Next we attached a bow made from the three ribbons. The bow was made with three loops on each side using all three of the ribbons. It was about 12" in diameter. Here's a link to a video to show how we made the bow.
Secure the wreath bow to the Work Wreath frame with the chenille stem. When finished with your wreath, be sure to check the back for any sharp edges that might scratch your door or wall. Turn any chenille stem ends or zip ties toward the inside of the wreath, cover them with tape if necessary.
You can make a hanger for your wreath by putting two zip ties together and attaching to the wreath form.
You have ribbon left over from this project enough to make some ribbon strips if you like. You can also make any sort of bow and attach it differently, what we did was just a suggestion)))
The finished wreath measures about 24-26" It probably would be best not to place on a door that would be slammed a lot!
Hope you enjoyed our tutorial and we hope you'll share it with your friends! Be sure to subscribe to our YouTube channel so you won't miss getting a notice when our next video comes out.
Save